Network Address Translation – Concepts and Application

Network Address Translation (NAT) is a method of mapping one IP address space into another by modifying network address information in the IP header of packets while they are in transit. i.e. Basically, for an IP packet in transit,  the IP address is changed from one to another in a pre-determined manner.

Next question would be the need to translate (or map) one IP to another. There are multiple reasons for this translation as detailed below:

  • Translation of private addresses into unique public addresses when accessing the Internet: Many organizations use private address space internal to the organization with a view of conserving the IP addresses. When a host with a private address needs to access another host across the Internet, the private address has to be mapped to a public IP address before sending the packet over the Internet. The reverse process takes place when the packet arrives from the public Internet addressed to a host withing the organization.
  • Translation of addresses when transitioning internal addresses from one address range into another: Within an organization, some times need arises that an address range is mapped to another address range for compatibility reasons. For example, Company A acquires Company B, then the former may like to map the address range of the later for policy and compatibility reasons. NAT is used under such circumstances.
  • When simple TCP load sharing is required across many IP hosts: Assume that you have an application server catering to the needs of the entire organzation and you would like to distribute the load across various such servers for faster response times, but the end-user sees only one server (IP address or host). In such cases, NAT allows you to distribute the load across several servers and and yet the users communicating to a single host.

Now that we know some of the cases where network address translation is useful, we discuss various types of NAT:

  1. Static NAT: Maps an unregistered IP address to registered IP (globally unique) addresses on one-to-one basis.
    The command, ip nat inside source static <local ip> <global ip> configures address translation for static NAT.
  2. Dynamic NAT: Maps an unregistered IP address to a registered (globally unique) IP address from a group of registered (globally unique) IP addresses dynamically. It is not necessary that a host gets the same IP address for the second time.
    The command, ip nat inside source list <access-list-number> pool <name>
    is used to map the access-list to the IP NAT pool during the configuration of Dynamic NAT.
  3. Overloading NAT:A special case of dynamic NAT that maps multiple unregistered IP addresses to a single registered (globally unique) IP address by using different port numbers.
    Dynamic NAT with overloading is also known also as PAT (Port Address Translation).
  4. Overlapping NAT: When a host on your network is assigned an IP address that is on the same subnet as another device on the Internet or external network, the result is overlapping networks.  It is possible to allow communication between two overlapping networks without having to renumber any devices by using Network Address Translation (NAT).

Below are some of key terms related to NAT which play important role in IP address Translations:

  • Inside Local Address
  • Inside Global Address
  • Outside Local Address
  • Outside Global Address

In the above term, first we break down the words Inside, Outside, Local, and Global for clarity.

  • Inside = Under control of the customer. This will reside inside the customer network .
  • Outside = Customer can’t control and reside outside the customer network.
  • Local = Private addresses and refers to the address on the inside of your network.
  • Global = Public IP addresses which are Globally routable addresses. This refers to the address on the outside of customer network.

Now we come back to the 4 key terms of NAT:

  • Inside Local Address – Private addresses that customer can control. This is the IP address assigned to an end host on the inside  network. The IP address is provided by the customer himself and is not required to be taken from IP address authority or Service provider.
  • Inside Global Address – Public addresses that the customer can control. An example is the globally routable IP address(es) ISP provides to the organization (customer). A local address can’t traverse the Internet. Therefore, it needs to be translated to a global address before entering the global Internet. A packet with local IP address (generated on the local host) and destined for another host on the public Internet, needs to be translated to a routable public IP address given by the ISP.
  • Outside Local Address – Private Addresses that are outside of customer’s control. This is the address that the inside hosts use to refer an outside host. The outside local address may be the outside host’s actual address or another translated private address from a different private address block. In other words – The IP address of an outside host as it is known to the hosts on the inside network.
  • Outside Global Address – Public addresses that are outside of customer’s control.These are Globally Routable addresses and is the public IP address assigned to the end device on the other network to communicate over internet.  For example, if an internal host is accessing Google mail server on the Internet, the address of the Google mail server would be the Outside Global address and you have no control on the IP assignment on Google mail server.
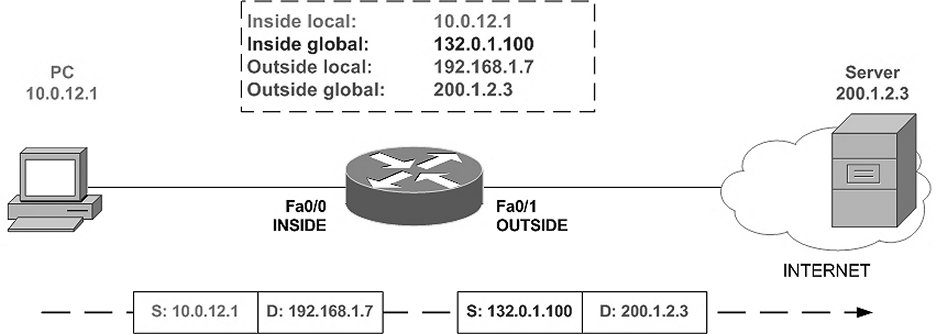
By looking at the figure above, we can interpret various addresses as below with respect to host 10.1.12.1 and outside host 200.1.2.3

  • Inside Local address:10.1.12.1
  • Inside Global address:132.0.1.100
  • Outside Local address:192.168.1.7
  • Outside Global address:200.1.2.3

As you can see Inside Local and Inside Global corresponds to the customer and Outside Local and Outside Global corresponds to the outside host. Some times it would be confusing if this point is not clear during the exam.

Ref.: http://www.ciscopress.com/articles/article.asp?p=1725268

Spanning Tree Protocol (STP) in Local Area Networks (LANs)

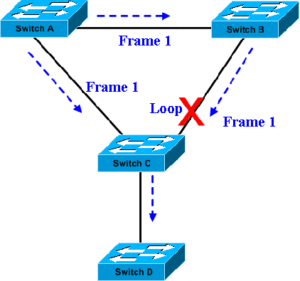
What is Spanning Tree Protocol: In computer networking, data packets are forwarded from one network node to another as the packet travels from source to destination. However, in Ethernet networks, it is quite possible that these packets (in strict sense, these are called frames as they traverse at layer-2 of the OSI layer format within LAN) have multiple paths to the next hop address. Consider the simple figure given below:

Assume that Frame 1 originating at SwitchA needs to reach destination SwitchD. As may be seen in the adjacent figure, Frame 1 originating a SwitchA has multiple paths to reach SwitchC. If the redundant path is not blocked, it may result in a loop. i.e. the same frame Frame 1 may be broadcast at SwitchC and again come back via SwitchB. Remember that bridges and layer-2 switches natively send frames to all ports other than the port on which the frame is received.
Note: STP allows redundancy in Layer-2 networks. For example, in the above network, if the link from SwitchA to SwithcC fails, then the frames are transmitted via SwitchB.

The exact path that a frame takes when traversing from one node to another within a LAN depends on the STP configuration, and we discuss this later.

In summary, Spanning Tree Protocol (STP) is a network protocol designed to prevent layer 2 loops and it’s standardized as IEEE 802.D protocol.

Fundamentals of simple STP: STP runs within LANs, ie. on Layer-2 devices such as simple switches and bridges. If you are sitting in a office environment, it is very likely that you are connected to your office LAN consisting of switches and bridges. As mentioned earlier, the single most important feature of STP is to prevent loops within a network, and at the same time offering network redundancy. We discuss the mechanisms that are followed to achieve this objective.

STP uses what is known as BPDU (Bridge Protocol Data Unit), a multicast frame, to share information about switch and its interface connections. Switches within LAN use BPDUs to learn the LAN topology. BPDU frames are sent out as multicast in every two seconds. The LAN requires a reference node that controls all operations, and that node is Root Bridge.

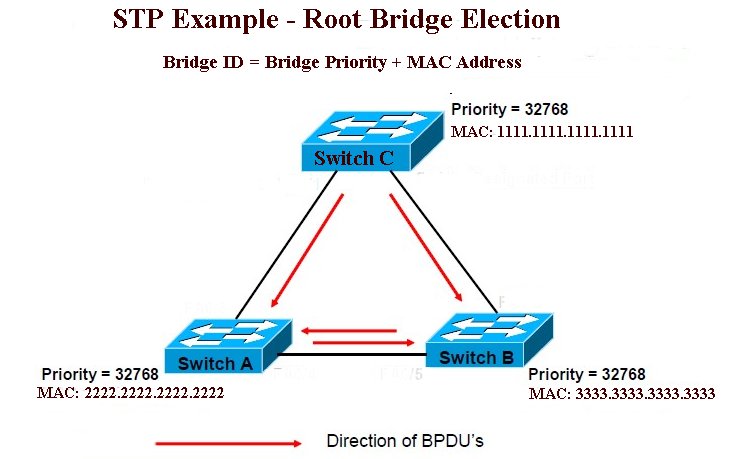
Root Bridge is selected using the following criteria in STP:

  •  The switch with the lowest Bridge Priority field becomes the Root Bridge.
  • If there is a tie between switches having the same priority value, then the switch with the lowest MAC address becomes the Root Bridge.

Default priority value is 32768. If you want one switch to be Root Bridge, change its priority value to less than 32768. Selection process of Root Bridge runs each time when you add or remove a switch or a bridge in the LAN topology (note that switch and bridge are used interchangeably here for understanding). If other switches in network do not receive BPDUs from Root Bridge within a specified time (usually 20 seconds), they assume that Root Bridge had failed and an election process to choose a new Root Bridge will occur.

Note:  There are different flavors of STP, simplest being CSTP (Common STP) that will have only one LAN. In the entire article, we are assuming that VLANs are not used within the LAN network. When using VLANs, multiple instances of STP are present. These are defined by Multiple Spanning Tree (MST), Per-VLAN Spanning Tree (PVST) and Per-VLAN Spanning Tree Plus (PVST+). Once the concept is clear, it can be extended easily to networks with VLANs.

Root Bridge Election Process: Each BPDU consists of the following:

  1. Root Bridge ID or Root BID – BID of the switch that the sender of this BPDU believes to be the root switch
  2. Sender’s Bridge ID – BID of the switch sending this Hello BPDU
  3. Cost to the Root Bridge – The STP cost between this switch and the current root
  4. Timer values on Root Bridge – Hello Timer, Max Age Timer, Forward Delay Timer

Example:

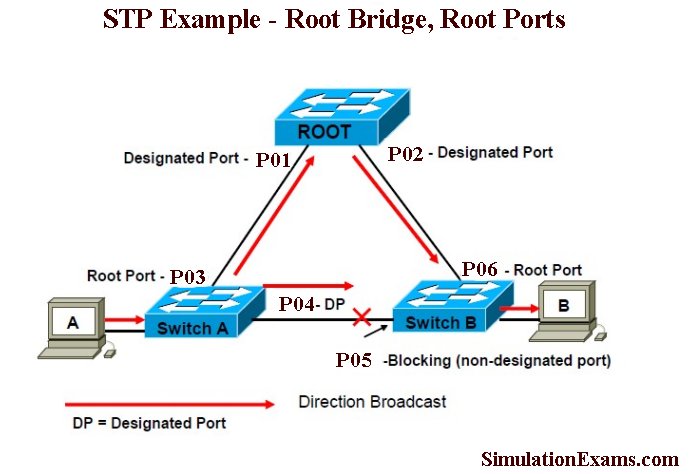
In the figure above, all the three switches (Switch A, Switch B, and Switch C) are propagating BPDUs as shown. The Root Bridge is not yet elected. Switch C has the lowest MAC address and hence elected as the Root Bridge (Bridge priorities are same for all three switches here, otherwise, Switch with higher priority value would have been elected as Root irrespective of the MAC addresses). The figure below shows the final network topology after STP convergence. Note that P05 port is blocked with the assumption that all links have same bandwidth.
To recapitulate, initially each switch within the LAN assumes itself as the root bridge and sends out BPDUs. However, when a BPDU with better Bridge ID (BID) is received, it replaces Root Bridge ID in it’s own BPDU with that of the superior BID. This process continues till every switch with in LAN agrees on which switch has the lower BID, and hence deserves to be the Root Bridge.

Non-Root Bridge: All other switches in LAN except Root Bridge are known as non-Root Bridges. Non-Root Bridge receives updates from Root Bridge and update its STP database.

Port Costs:  STP assigns each port within LAN a cost, called port cost. Port cost is used to choose the best path when multiple paths are available between two switches. Port cost is determined by the bandwidth of connected media link. Switch always use the lowest port cost to forward the frames. As may be seen from the table below, higher the bandwidth.. lower the port cost.

Two set of port costs exist.

Bandwidth             Old Cost Value             New Cost Value
10 Gbps                                 1                                       2
1 Gbps                                    1                                       4
100 Mbps                          10                                      19
10 Mbps                          100                                   100

Note: In STP,  lower number reflects better ranking.

Root Port: Spanning Tree Root Port selection process in a Non-Root Switch is done using steps below:

  1. Select the port with the lowest Path Cost to the Root Bridge as the Root Port, (applicable only if a Non-Root Switch has two or more paths to reach the Root Bridge).
  2. If there is tie, Non-Root Switch will select the local port which is receiving lowest Bridge ID from neighbor Switch (Advertiser) as the Root Port.
  3. If there is a tie, it will select one with lowest received port-priority
  4. If there is a tie, Non-Root Switch will select the port which receives the lowest physical port number from neighbor Switch as the Root Port. This is the last tie breaker

Just remember the following:

Lowest Root Path Cost (tie) -> Port Receiving the Lowest Bridge id (tie)-> Lowest Received Port-Priority (tie) -> Lowest Advertised Port Identifier

Other related terms:

Designated Port:  Designated port is the port that is selected as having the lowest port cost. Designated port would be marked as forwarding port.

Non-Designated Port: Non-designated port is the port that is selected as having the higher port cost than the designated port. Non-designated port would be marked as blocking port and will not forward any frames. Of course, if there is any change in topology of the network, the same port may become a designated port.

Forwarding Port: Forwarding port is used to forward the frames with in the network.

Blocking Port: Blocking port remains disabled to remove loops. in the network.

Summary of Selection of Root Bridge, Root Port, and Designated Ports:

1. Lowest bridge ID (Priority+MAC Address) switch becomes the Root-Bridge
2. Each non-root bridge should have ONE root port (RP) which is the port having lowest path-cost to Root Bridge.
3. All ports in Root Bridge become Designated Ports (DP)
4. Each segment should have one Designated Port (DP)
5. All RP/DPs will be in FORWARDING state & all other ports will be in BLOCKING state.

References:

  1. https://www.tutorialsweb.com/networking/tcp-ip/index.htm

VLANs in Computer Networking

Now a days, almost every organizational network uses VLANs, and it’s un-imaginable to have a LAN without a VLAN.

Traditionally, a Local Area Network (LAN) is a network of computers located within the same geographical area. Today, Local Area Networks are defined as a single broadcast domain. This means that if a host broadcasts information on LAN, the broadcast will be received by every other host on the same LAN. Broadcasts are prevented from leaving a LAN by using Layer-3 addressing, provided by a router or a layer-3 switch. The disadvantage of using routers (in comparison with L3 switch) is that they normally take more time to process incoming packets.   Given below are some of the advantages of VLANs:

  • VLANs enable logical grouping of end-stations that are physically dispersed on a network: When users on a VLAN move to a new physical location but continue to perform the same job function, the end-stations of those users do not need to be reconfigured. Similarly, if users change their job functions, they need not physically move: changing the VLAN membership of the end-stations to that of the new team makes the users’ end-stations local to the resources of the new team.
  • VLANs reduce the need to have routers deployed on a network to contain broadcast traffic. Flooding of a packet is limited to the switch ports that belong to a VLAN.
  • Confinement of broadcast domains on a network significantly reduces traffic. By confining the broadcast domains, end-stations on a VLAN are prevented from listening to or receiving broadcasts not intended for them. Moreover, if a router or a layer-3 switch is not connected between the VLANs, the end-stations of a VLAN cannot communicate with the end-stations of the other VLANs.

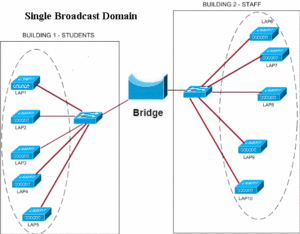
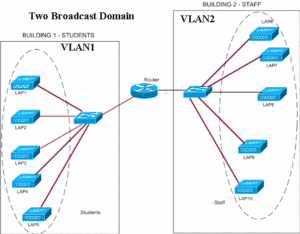
The figure shows a LAN network using single broadcast domain. As a result, both the groups (staff and students) will be on the same LAN. A bridge works at layer-2 of OSI layer and simply forward traffice from either end. Both Students and Staff networks form a single LAN. The next figure shows how a VLAN makes difference to the broadcast domain. In this figure, the two LANs have been segregated using a router.

A router doesn’t forward broadcast traffic and therefore, users in VLAN1 will not be able to communicate with users in VLAN2, unless the router is configured to forward traffic from VLAN1 to VLAN2 and vice versa. As we can understand from the explanation above, configuring VLANs requires a layer-3 address mapping. Each VLAN in a VLAN network will have a unique IP address which would be used to identify the VLAN, and forward traffic from one VLAN to another VLAN. We can also use a Layer-3 Switch instead of a router for this purpose. The benefit of using Layer-3 switch is shorter response times.
Static and Dynamic VLANs: VLANs may broadly be categorized in to Static and Dynamic VLANs.

Static VLANs: In a static VLAN, the network administrator creates a VLAN and then assigns switch ports to the VLAN. Static VLANs are also called port-based VLANs. The association with the VLAN does not change until the administrator changes the port assignment. End-user devices become the members of VLAN based on the physical switch port to which they are connected.

The ports on a single switch can be assigned to multiple VLANs. Even though workstations are connected to different ports on a same switch, traffic will not pass between them if the connected ports are on different VLANs. We need a layer 3 device (typically a Router) to enable communication between two VLANs.

Dynamic VLANs: In a dynamic VLAN, the switch automatically assigns the port to a VLAN using information from the user device like MAC address, IP address etc. When a device is connected to a switch port the switch queries a database to establish VLAN membership. A network administrator must configure VLAN database of a VLAN Membership Policy Server (VMPS).

Dynamic VLANs support instant movability of end devices. When we move a device from a port on one switch to a port on another switch, the dynamic VLANs will automatically configure the membership of the VLAN.

So, how VLANs are identified by a switch or router? How they are different from a packet that doesn’t use VLAN? VLANs are identified in a network by what is called as a “tag”.  Frame tagging is used to identify the VLAN that the frame belongs to in a network with multiple VLANs. The VLAN id is placed on the frame when it reaches a switch from an access port, which is a member of a VLAN. That frame is then forwarded out the trunk link port or other ports with same VLAN id. Each switch in network can see  VLAN id and accepts the frame if it has any ports that are members of the same VLAN. If it doesn’t have any port with matching VLAN id, it simply ignores the frame. One more thing could happen. If the switch has a “trunk” link, the frame is forwarded across the “trunk port” to another switch.

A trunk port is a port that is assigned to carry traffic for all the VLANs, a process known as trunking. Trunk ports mark frames with unique identifying tags – either 802.1Q tags or Inter-Switch Link (ISL) tags (not both at the same time, network admin chooses the tag type at the time of configuring the network)– as they move between switches. Therefore, every single frame can be directed to its designated VLAN.

An Ethernet interface can either function as a trunk port or as an access port, but not both at the same time. A trunk port is capable of having more than one VLAN set up on the interface. As a result, it is able to carry traffic for several VLANs at the same time.

If a switch receives untagged Ethernet frames on its Trunk port, they are forwarded to the VLAN that is configured on the Switch as native VLAN. Both sides of the trunk link must be configured to be in same native VLAN. It is not usual for a Switch port configured as a trunk port to receive untagged Ethernet frames. But it will happen if you are using Cisco VOIP phones in your network.

Note: The IEEE committee that defined 802.1Q decided that for backward compatibility it was desirable to support native VLAN,  a VLAN that is not associated explicitly to any tag on an 802.1Q link. This VLAN is implicitly used for all the untagged traffic received on an 802.1Q capable port (Trunk port).

Frames from all VLANs are carried across the trunk link containing the 802.1Q or ISL tag, except for frames belonging to VLAN 1. By default, frames from VLAN 1 belong to native VLAN, and are carried across the trunk untagged. Frames from the native VLAN, VLAN 1, are carried across this trunk link untagged.

Now, we have several VLANs and routers or layer-3 switches have been setup to communicate between VLANs. However, it becomes very difficult to add VLANs, or modify VLANs on several switches. VTP, short for VLAN Trunking Protocol (a Cisco proprietary protocol) makes that task less cumbersome by communicating the changes to VLANs.

VTP is a Layer 2 messaging protocol that maintains VLAN configuration consistency by propagating the addition, deletion, and renaming of VLANs within a VTP domain. A VTP domain (also called a VLAN management domain) is made up of one or more network devices that share the same VTP domain name and that are interconnected with trunks. VTP minimizes misconfigurations and configuration inconsistencies that can result in a number of problems, such as duplicate VLAN names, incorrect VLAN-type specifications, and security violations. With VTP, you can make configuration changes centrally on a single network device and have those changes automatically communicated to all the other network devices in the network.

VLAN Trunk Protocol (VTP) reduces network administration in a switched network by auto propagating the latest VLAN information. When you configure a new VLAN on one VTP server, the VLAN is distributed through all switches in the domain. This reduces the need to configure the same VLAN everywhere.

Configuring VLANs:

VLANs provide logical segmentation of networks by creating separate broadcast domains. A VLAN can span multiple physical network segments. The end-stations belonging to a VLAN are related by function or application.

For example, end-stations in a VLAN might be grouped by departments, such as engineering and accounting, or by projects, such as release1 and release2. Because physical proximity of the end-stations is not essential in a VLAN, you can disperse the end-stations geographically and still contain the broadcast domain in a switched network.

You can manage VLANs by creating, deleting, or displaying information about them.

Note: VTP is a Cisco-proprietary protocol that is available on most of the Cisco Catalyst series products. Similar protocol is available with all other make switches, such as Juniper switches.


Anand Software Updates CCNA app for iPhone

Anand Software and Training updated CCNA exam app for iphone and ipad. There are several changes to the update, including the following:

– New questions have been added
– Randomising questions in learn mode.
– Night mode and full screen option while taking exam.
– Bookmarking questions learn mode and exam mode.
– Option to retake bookmarked, unanswered or incorrect questions while
taking exam.
– Improved flash cards with support for images.
– Exam configuration (changing exam time and number of questions per exam)

Some of the screen shots have been provided below for brief review of the product features:

exam sim for iphone app

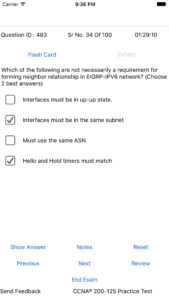
This screen shows the exam page of the app. As you can see it displays the multiple choice question with answers. Navigation bars for Show Answer, Notes, Reset, Previous, Next, Review and End Exam are provided (which are self explanatory).


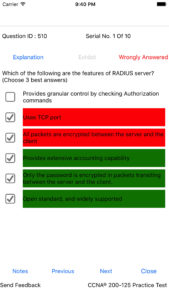
Given here is the exam review screen. As may be seen, right answers are shown by green bars, where as the wrong answers are shown by red bar(s). The ones shown in red are the choices marked by the candidate. The review screen enables candidates to know right answers and learn the subject by using associated flash card (by clicking on the flash card).


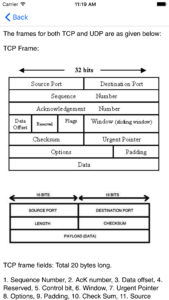
The screen shown shown beside is an example flash card, and it is formatted in html with hyperlinks for thorough preparation. It is advised that candidates go through the flash card explanations for wrongly answered questions.


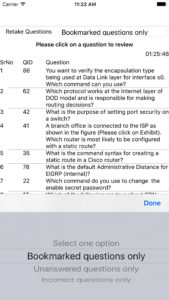
The screen shot provides an overview of the review screen. After you end the exam, the Review option is enabled. Here, you can review all the questions (if the time is still remaining) or close the Review and End the exam. After End Exam, you will not be able to make any changes to the exam answers. The questions may be broadly categorized in to 1) Answered questions 2) Un-answered quesitons, and 3) Bookmarked question. Note that 1) or 2) may still be book marked. Candidates can bookmark a question for later review.


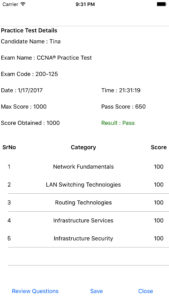
This screen shot shows the grade sheet that’s displayed after completion of the exam. As you can see, the percentage of marks is displayed for each topic as well as the aggregate. By viewing the topics that a candidate had performed poorly, one can improve the chances performing well in the actual exam.
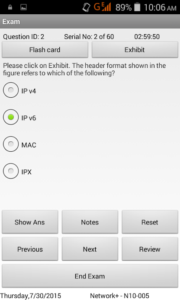


The iphone apps are available for CCNA, Comptia A+, Network+, Security+, PMP, and others. Please check out the website for up to date information, and download free trial versions of the software.

Also, check out the free CCNA app for iphone, which is limited to one test (60 questions) with all other features available.

Anand Software Updates CCNA Android App

Anand Software and Training recently updated it CCNA Android app practice tests to include additional questions, and fixed a couple of bugs. A randomization option has been provided in the Learn Mode also (it’s already available in Exam Mode).  The CCNA Android app, which provides a simulated exam environment that looks exam-like is useful for candidates appearing for CCNA certification exam. The CCNA app contains 400+ most relevant questions with answers and flash card explanation for each question.

Recent changes are given below:

  1. Question database update (addition of new questions)
  2. Randomization of questions
  3. Bug fix – a bug showing “night mode” has been fixed

Important features of the android app with screen shots are given below:

CCNA Android app login

Given here is the login screen shot. Login allows that two or more people take the exam, yet maintain separate statistics. The login is not linked to the website, and it’s local to the mobile. You can download the demo version for viewing various features of the exam.


CCNA ExamThis screenshot provides the exam mode screen of the CCNA app. The question types include Multiple Choice Single Answer and Multiple Choice Multi Answer. Given in the figure is a MCSA question.
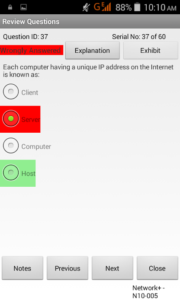


CCNA Android app review screenShown beside is the review screen of the CCNA prep exam. This screen may be invoked after completion of the practice exam. As can be seen in the figure, your answer (in case it is wrong) is shown in red, and the right answer is shown in green color. The review of wrong answers after the exam is over, enables candidates to see where exactly he has made a mistake in answering the question.
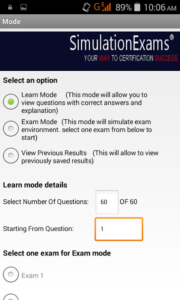
 

Exam mode selectionHere, you select the mode of the practice test. Two available modes are Learn mode, and Exam mode. If you have just started you preparation, you can start with Learn mode. If you have finished with your preparation and like to feel how the actual exam, then take Exam mode.


The question bank is updated from time to time to reflect most recent exam topics, and additional features are added to the app to make it more responsive and up to date. Please email us for leaving any feedback.

App download link: https://play.google.com/store/apps/details?id=com.anandsoft.ccnaexamsim301full

Free (limited to 60 questions) app download: https://play.google.com/store/apps/details?id=com.anandsoft.ccnaexamsim301

Other Cisco apps available include:

  • CCENT app (Full)
  • CCENT app (Free)
  • CCNA ICND2 app (Full)
  • CCNA ICND2 (Free)

Disclaimer: CCNA™, CCENT™, ICND2™ are registered trade marks of Cisco® Systems. The practice tests material is a copyright of SimulationExams.com and the same is not approved or endorsed by respective certifying bodies.